
At the end of the last section, we used the style attribute to center an image. In this section, we will use the style attribute to customize our headings and paragraphs. It is important to note that most courses on HTML and CSS will tell you to NOT use the style attribute to customize the appearance of your text. Instead, they will tell you that you should ALWAYS use a CSS Style sheet. People who say this spend too much time in Ivory Towers instead of building real websites. While this advice to use CSS is generally true in theory, in real web design we have an important saying:
|
An Important Saying |
In theory, theory and reality are the same… But in reality, theory and reality are often quite different! |
Using the style attribute to define the appearance of a particular element, such as a particular heading or a particular paragraph, can be useful when you want an element to appear differently from the other headings and paragraphs around it. You can even use the <span> element combined with the style attribute to make any section of a paragraph or sentence appear different from the rest of the paragraph or sentence. The reason this is possible is that the Style Attribute has priority over whatever appearance settings are placed in a CSS style sheet. Style attributes will also over-ride the default style settings in your web browser. Thus, style settings give you full control over the appearance of the content on your website – even if for some reason you are working on a web page that has a dozen different style sheets applied to it and you do not have access to any of these style sheets.
The problem with trying to use CSS style sheets is that, with many style sheets, it may not be clear which style sheet is used to modify a specific part of your web page. It is also possible that changes made in one style sheet can inappropriately over-ride other style sheets, adversely affecting the appearance of other sections of your website.
So read on and learn several ways to directly format your web page text in the effect of this all too common emergency.
Advantages of Inline CSS Style Attributes
CSS stands for Cascading Style Sheets. It is a way of assigning appearance properties to various parts of a webpage or newsletter based on how close the property is to the tag or element being modified. CSS used for directly formatting text is called Inline CSS because it uses the style attribute placed right inside of the HTML Heading and Paragraph Tags. The benefit of inline CSS is that it has a higher priority that the other two ways of styling a website – CSS STYLE SHEETS, and placing CSS STYLE ELEMENTS inside of the HEAD of the index.html file. CSS STYLE SHEETS are best used when you want to make changes in appearance to an entire website. CSS STYLE ELEMENTS (using the <style> tag) in the head of an html file are best for making changes to an entire page. But the best solution to insure that a change is made in a specific area of a web page, such as modifying the appearance of a specific heading, paragraph, sentence, word, table, row or cell, is to use inline CSS style attributes.
CSS Properties
CSS properties are the specific options for modifying the appearance of HTML tags or elements. There are different property options for Headings, Paragraphs, Tables, Rows, and Cells. In addition, there are different table options for the two main kinds of cells (image cells versus text cells). One benefit of completely separating image cells from text cells is that we can clarify the styling – using one set of CSS properties for image cells and a different set of properties to modify the appearance of text cells when formatting the appearance of a layout table (which we will discuss in greater detail in the next chapter).
A common question is which properties of the headings, paragraphs, tables, rows and cells should be called out or modified? The truth is that all of the following property modifications are optional. However, be aware that if you fail to specify the precise properties you want for the appearance of your web page or table, you will be leaving it up to the CSS style sheets and or the browser default settings to define the various properties. Because different browsers have different default settings, if you fail to define the following properties, your web page may look very different from one browser to the next. So the best option is to define all of the important properties listed below for every heading, paragraph, table, row and cell where its precise appearance matters.
CSS Style Sheet Rules and Declarations for Website Templates
We will discuss CSS in greater detail in later chapters. Here we will have a brief discussion of CSS terms since the same terms apply to inline CSS styles as apply to CSS style sheets. A CSS rule is a line of code which modifies a particular HTML element. Each CSS Rule has three main parts: a selector, and one or more properties and one or more values. This is what a CSS rule looks like in a CSS Style Sheet:
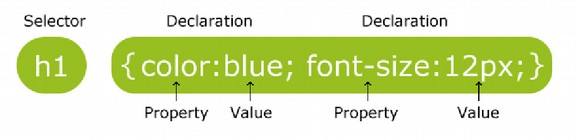
The selector is normally the HTML element you want to style. Each CSS or Style declaration consists of a property and a value. The property is the style attribute you want to change. Each property has a value which must be precisely spelled out.
Inline CSS Style Attributes for Specific or Special Text Elements
An Inline CSS Style Attribute rule is an option to quickly and clearly modify a particular HTML element such as a heading, paragraph, table or cell. Inline CSS is different from CSS style sheets because it is placed right inside of the HTML table tags, row tags, cell tags, and image tags. Inline CSS takes priority over any other CSS rules and any default rules in the browser. The drawback of inline CSS is that, unlike CSS Style Sheets, Inline CSS requires a lot of repetition of the CSS Style rules. The style rules need to be repeated in every heading, paragraph, table and cell you want to look different from the rest of the page.
Each Inline CSS Style Attribute Rule has three main parts: an html element, such as a heading, paragraph, table or cell, plus one or more properties with one or more values. CSS rules inside of a cell are usually preceded by a STYLE EQUALS function after which each property and value are put inside parenthesis and separated by colons and semi-colons. Below is a cell element with a style which makes the words “text here” in this paragraph blue and the font size 12:
<p style=”color:blue; font-size:12px;”><text here></p>
Here is the generic format of inline CSS using the style attribute:
<html element style=”Property:Value; Property:Value;”><This is the text being modified by the inline CSS></element closing tag>
Note that the style equals function is called out right inside of the html opening tag arrows:
<element (such as h1) style=”property:value;”>
Then the text comes after the right pointing arrow or bracket. The text is followed by the closing tag. Below is another way to think of the basic pattern of Inline CSS for text elements:
<opening html tag> Style = “css-property1:property1-value; css-property2:property2-value;” ><text here></close of html tag>.
It is essential that all of the tags, quotation marks, colons and semi-colons are in the right place. This is why you are better off copying the above code and changing the values instead of trying to write the code yourself and forgetting a semi-colon.
Difference between the Style Attribute and the Style Element
The above HTML uses the style= attribute to define properties and values. The style attribute is different from the Style Element in that the style attribute is used inside of another element and does not need a closing tag. The Style Element is used only in the HEAD section of an html document and does require a closing tag. The style attribute always goes in front of the text it is modifying.
Inline CSS without the STYLE EQUALS function for structural elements
The Style Equals function (style=”property:element;” is a shorthand way of using inline CSS used mainly for styling text. There is another way to specify CSS properties and values for structural elements such as tables, rows and cells. This is to begin with the opening tag of the structural element, then call out each property and value as a separate function with separate parenthesis:
<td height=”40” valign=”top” align=”center” bgcolor=”#00aa00”>
<selector property1=”value” property2=”value”>
Note that with structural elements and using individual functions for each property, there is no use of colons and semi-colons. We merely put a single space between each property/value declaration and put parenthesis around every value.
Which is better… using the Style Function or Individual Property Functions?
While you can generally use either method, you are generally better off using the Style Equals method as it is more closely related to the CSS methods we will use later in this course.
Using the Bluefish Editor to Insert Inline Styling Attributes
Now that we have a rough idea of the Style Equals attribute, let’s use the Bluefish editor to put this theory into practice. Open the Bluefish editor and use the Quick Start icon to create a new HTML page. Give it the title, My First Style Attributes Page. After the body opening tag, type in My First Style Attributes Page. For the paragraph, type: “This page will use several different style attributes.” Then save the page to your html_files folder with the name my_first_style_attributes.html.
Enter a new line and type. Here is my first sub heading attribute. Select the entire sentence and put it in an H2 tag. Save the file and view it in a web browser.
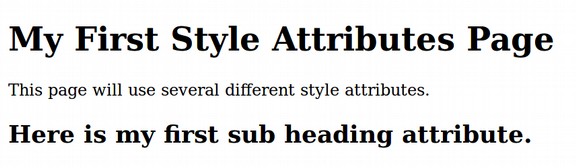
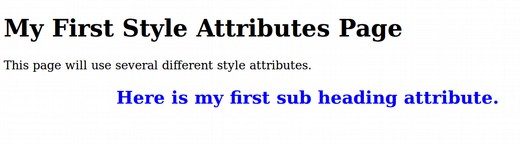
Because the HTML document did not define any styles, it was up to our web browser to determine how to display each of these three elements. Web browsers do not have much of an imagination. Text can appear pretty boring when it is not styled. Now go back to our Bluefish workspace and place a style equals attribute inside of the opening H2 tag so it looks like this:
<h2 style=””>
Then place your cursor inside of the two paratheses and begin typing the word color (Bluefish will help you). Then put a colon and click on Tools, Insert, Insert Color. Pick the blue color from the Color Picker which will insert the hexadecimal code for blue (#0000FF). Type in a semi-colon. Then a space. Then begin to type the word text-align (Bluefish will help you). Type in a colon. Then type in the word center followed by a semicolon. Here is the HTML:

Save the file and open it in a browser.
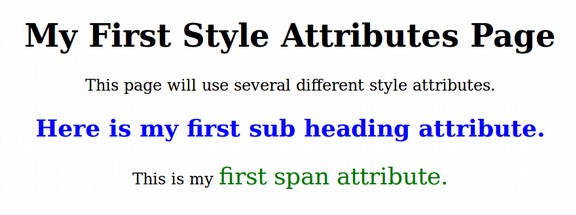
We should also center the Heading 1 sentence. Select the entire sentence including the H1 tags. But this time, instead of typing in style=”text-align: center;” simply click on the Standard Tab. Then click on the Center icon.
There is a third way to center align a paragraph. Select the entire sentence below the Heading 1 including the paragraph tags. Then in the top menu, click on Tags, Format General, Center.
Next, enter a new line and type: This is my first span attribute.
Put the sentence in a paragraph tag. Then select the final three words of the sentence (first span attribute) and click Tags, MISC, Span. This will place the span opening and closing tags around these three words. Then place your cursor inside of the span opening tag just before the closing bracket of the opening tag. Enter a space. Then type style=””. Then between the paratheses, type color: #007700; font-size: 24px;. Then select the entire sentence and click on the Center icon. Then save the file and view the result in a browser.
This concludes our introduction to the Style Attribute. We will cover CSS styles in greater detail in the following chapters.
What’s Next?
There are other options to directly format text. We will cover some of these options in the next section.