
All too often, your web pages will not appear in the manner you expect. In other cases, you may wonder how others get their websites to look so much better than yours. In this section, we will review some methods you can use to solve appearance problems on your website and learn from the appearance methods used on other websites.
Save Your Files and Clear Your Cache
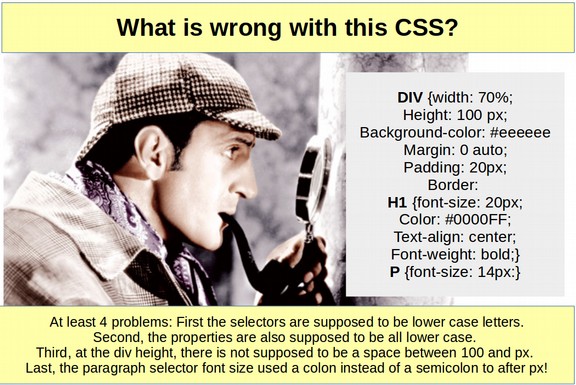
You made several changes to your CSS and or HTML only to see these changes fail to appear when you open the page in a web browser. When things do not appear as you expect, first make sure that you did not miss a colon or semi-colon in your CSS. Then make sure that you saved both your CSS and HTML files. Then make sure you cleared your Firefox browser cache. The easiest way to clear this cache is to go into Firefox preferences and display the top menu.
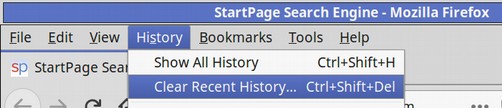
Choose Clear Everything and click Clear Now. Then refresh and reload the page.
Use Firefox Web Developer Debugger to Better Understand the CSS
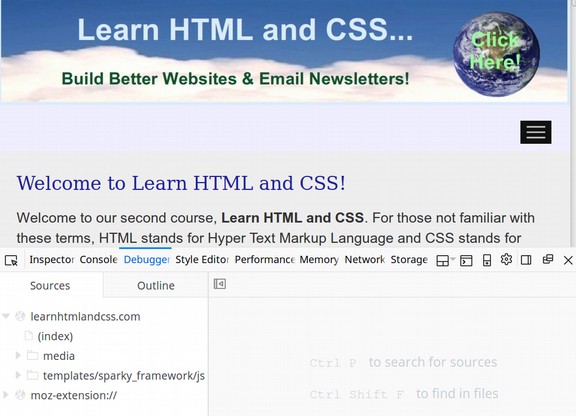
If you are still having problems, Firefox used to have a free tool called Firebug. It is now a part of the Web Developer Tools and is simply called the Debugger. To open it, go to Tools, Web Developer and click on Debugger. A split screen will appear with your web page at the top and the debugger at the bottom.
To understand why the title is so big or to analyze any other element on the page, click on the small box to the left of the Inspector and hover it over the title.
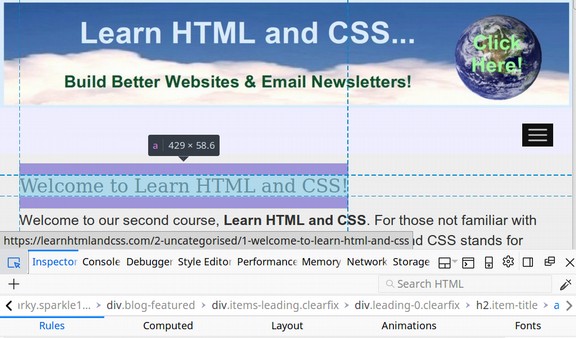
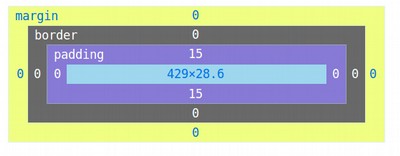
The entire box model will be show over the element in question. More important, a bunch of information will appear in the lower screen.
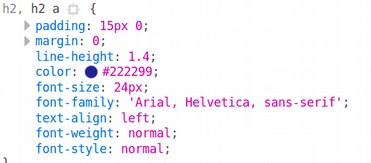
The title uses the h2 element and is 24px and the blue color is #222299 and these CSS rules are contained in a sparky.css file. Click on the Layout Menu item to see the box model for this element.
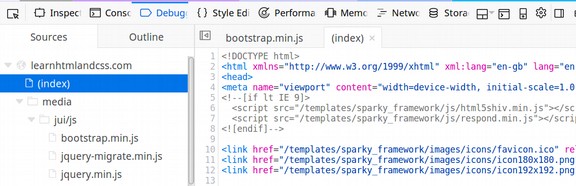
Click on Debugger sources to see the entire folder structure and all of the files for this website. Click on the index file to see the HTML for the Home page.
Click on the Style Edit menu item to see all of the CSS style sheets and rules.
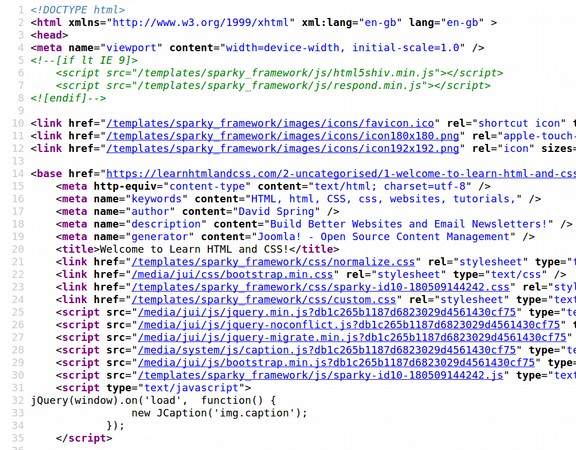
You can also get much of this same information by right clicking on the page and then click View Page Source:
The custom CSS sheet over rides all of the others and is therefore the most important style sheet. Click on it to see the classes used for our colorful menu items:
Scroll down to see the CSS for our colorful linear gradient backgrounds:
Take a Trip to CSS Zen Garden
There is a website that specializes on showcasing how different content can look like using different CSS Styles. This website has hundreds of creative examples – all of which have the same content – only different style sheets. You can download the HTML and CSS files for the web pages that you like the best.
Here is the link:
Here is the Home page:

Click on the menu item to view all designs.
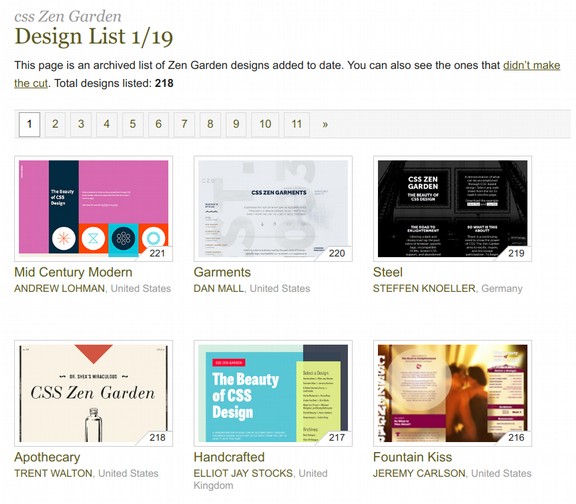
There are currently 218 designs over 19 pages.
Here is a link to number 39:
http://www.csszengarden.com/039/
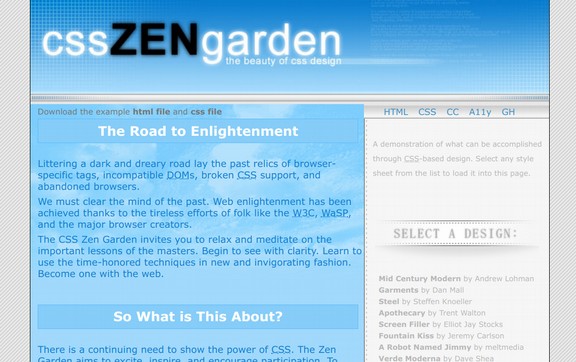
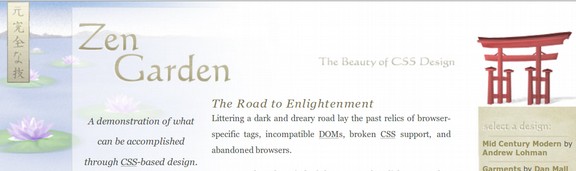
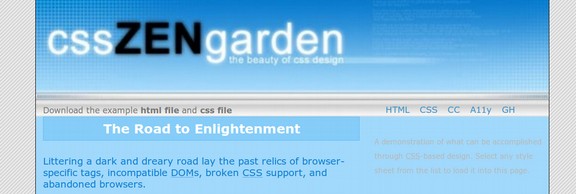
It is much better organized than most of the examples. It has large boxes on the left with very clear title boxes. Then on the right, there is a simple menu with a series of boxes below with artistic titles. The background image features slanted lines giving the page a raised effect. How was all of this done?
Just download the HTML and CSS files. You can also just scroll down the page to view the page’s CSS file. If you still do not understand how the heading box called The Road to Enlightment was made, then open up the Debugger and hover the element inspector over it. Here is how the HTML was done:

The author created a divide for this element and then created an ID called zen-preamble. Then the author created a class called Preamble. Here is the CSS box for this element:
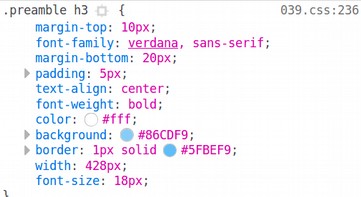
The CSS is in a file called 039.css. The font size is 18 px and the font color is #FFF which is white. The background color is #86CDF9 which is light blue. The box that the title is in is 428px wide. Now we know a lot more about how this element was styled. But if we are really interested in understanding how another website was built, we can go even further.
Reconstructing the Scene of the Crime
Let’s download the HTML and CSS file, create a new top level folder called Zen Garden Test Website. We would normally put the CSS file in a CSS folder but the CSS link indicates that this CSS file is in the root folder and there is no css folder. So load the html into the root folder with the css file. Then open the index.html file with the Bluefish Editor and view it with the browser. Here is the file with no CSS link in the head of the document.
Now add this link for the CSS file to the head of the document.
<link href="/file:///home/david/Zen Garden Test Website/css/style.css" rel="stylesheet" type="text/css" />
Then save the index.html file and open it in the browser again.
We seem to have downloaded the default CSS file instead of the modified CSS file. Right click on the page for version 39 and click on View Source. Then click on the CSS file in the head of the document to go to the actual CSS file. Here is a direct link to the modified CSS file.
http://www.csszengarden.com/039/039.css?v=8may2013
Right click on the CSS page, then click Save As and save it as 039.css to your root folder. Then in your index.html file, change the CSS link to:
<link href="/file:///home/david/Zen Garden Test Website/039.css" rel="stylesheet" type="text/css" />
Save the file and load it in the browser:

We are getting better, but the header and body background image are missing.
Examine the web page with the debugger and or just look at the index.html file and you will see that the header is called a banner.
Look at the CSS file and you will see that on line 19, there is a background image relative url of (bg-grid.gif). If the image does not display, there is a fall back color of #ebebeb which is light gray. This is the background image for the body of the web page – or space behind and to the sides of the content.
On the 039.css file line 84, the page wrapper has a background image relative link of (bg-full.gif). This image is repeated in the Y or vertical direction. If the image does not display, there is a fall back color of #A1D9FC. Here is what this hexidecimal color looks like:

On the 039.css file line 90, the header h1 has a background image relative url called (intro_bg.jpg). There is no repeat and no fallback color listed so if this image is missing the background will simply be the wrapper background of #A1D9FC. This is the header image.
At lines 155 and 165, there are a couple of side bar images, but we will not deal with them for now. What we need now is to find the absolute URLs for the three images we are interested in. Our goal is to download or copy these images and place them in our own website images folder so we can display a web page that looks very similar to the real web page.
Here is the web page URL:
http://www.csszengarden.com/039/
Because the relative URL is missing the two dots in the beginning of the file name, we will assume the images were placed in the root directory. Thus the URL for the second image is
http://www.csszengarden.com/039/intro_bg.jpg
Enter this URL in your web browser.

Right click on the image and copy the image. Then paste it in a writer document and compress the file size.

Then save it to the website root folder as intro_bg.jpg
Now save the index.html file and view it again in the browser. The header image still does not display. You can either add two dots and a forward slash to the relative URL or change the image file name in the css file to our own absolute URL. Copy and paste this between the paratheses:
file:///home/david/Zen%20Garden%20Test%20Website/intro_bg.jpg
Then save the CSS file and the HTML file and view in the browser:
We are doing better. But the image is still not expanding to the full width of the divide. In the CSS sheet, delete the fixed width and height of 712 by 163. The debugger confirms that the page wrapper is 712 pixels wide. But my image does not cover this. Therefore something must be wrong with the width of my image. Open the image with Pix. It turns out the image is only 509 x 117.

Use Pix to increase its dimension to 712 x 163. Then save it without renaming it. Load it in the browser and it is now full width. We next need to get the real URL for the background image so we can copy it. It should be.
http://www.csszengarden.com/039/bg-grid.gif
Open this in a browser and you will see a small gray slanted line in the middle of the screen. Click on it. Then right click and select copy. Save it to the website root folder. Then save the HTML file and open it with your browser.
We have now created a nearly identical site allowing us to view and alter any part of the HTML and CSS with our Bluefish editor. As you visit sites on the web, always ask yourself, how did they do that? A right click on the screen and clicking on View Source and or bringing up the Firefox Debugger might ask your question!
What’s Next?
In the next chapter, we will review how to create page layouts.